Instructions for ProCraft Vacuum Machine for Investing and Casting
Introduction
Before using your vacuum pump- If using a ProCraft pump, refer to the manual for complete instructions and maintenance. If using another brand pump, refer to that manufacturer's instructions.
Precautions
- Wear Safety goggles.
- Read and follow instructions before starting.
- Avoid unintentional starting. Make sure the line cord switch on the pump motor is "off" when plugging in.
- Have a damaged or worn cord replaced or repaired immediately by a qualified electrician.
- Replace brittle or cracked vacuum tubing.
- Never leave equipment running unattended.
-
Check to make certain the voltage and frequency of the outlet match the specifications on the pimp motor decal. Check the ON-OFF switch to be sure it is in the OFF position before you plug the pump into an outlet. Check to be certain the gas ballast valve is closed. Remove and discard the exhaust plug from the end of the pump's handle.
-
The pump is shipped without oil in the reservoir. Before starting the pump, fill with oil. Remove the OIL FILL cap (black plastic plug directly in front of the handle) and add oil until oil just shows in the bottom of the sight glass. The approximate oil capacity of the pump is 15 ounces.
-
Replace the OIL FILL cap and position the isolation valve in the CLOSE position. Be sure the inlet parts are capped. Turn the motor switch to ON, then turn the isolation valve to OPEN. After the pimp runs for approximately one minute with the valve open, check the sight glass for proper oil level- oil should be even with the sight glass OIL LEVEL line. Add oil if necessary.
Setting Up
-
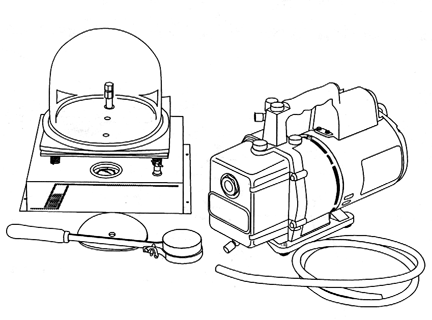
Mount the vacuum casting table on a bench of a height convenient for the easy manipulation of flasks, crucible and tongs, and investment mixing bowls. Fasten the casting table to the bench top with screws for rigidity.
-
Locate the pump securely on the bench, beneath or on the same level, close to the casting table. Connect the ½" I.D. vinyl tubing between the vacuum connection of the pump and that of the casting table. Connect to correct voltage receptacle with the switch "OFF".
-
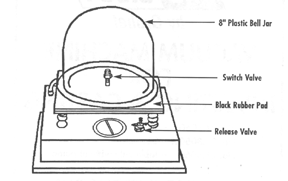
The table contains 2 brass valves- one (the switch valve) atop the vacuum table for use with the bell jar - the other (the release valve) adjacent to the vacuum gauge. Each is opened by a counter clockwise rotation of the top, requiring one or two turns.
-
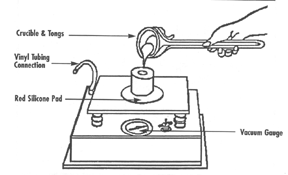
The black rubber pad is used with the bell jar. The hole in the pad goes over the switch valve which projects above the table. The central hole in the table is sealed by the rubber pad when the bell jar is in use. The red silicone rubber pad is used when casting. The hole in this pad is aligned with the hole in the table. The mold flask is placed centrally over this hole and the switch valve is closed.
Investing
The rubber bowl containing the mixed investment is placed on the vacuum table on top of the black rubber pad. The switch valve at the top center of the table is turned counterclockwise to open. The release valve to the right of the gauge should be tightly closed. The bell jar is then placed over the bowl and the pump is turned on. As the investment starts to boil, hit one corner of the vacuum table sharply to help release the air bubbles. After 1 minute, the release valve is opened to release the vacuum and the pump is turned off. The investment the poured into the flask containing the wax impressions, placed under the bell jar and, with the switch valve open and the release valve closed, the pump turned on.
When investment begins to boil and the vacuum gauge reads 25" of mercury or above, rap the vacuum table sharply and repeatedly, and allow to vacuum for 1 minute. Open release valve, turn off pump, remove flask and tap its side several times with the spatula or brush handle, to release any bubbles which may still be trapped.
Casting
Vacuum assist casting is a simple, safe and efficient method of casting metal articles. The vacuum machine creates a vacuum at one end of the flask which pulls the air and gases from the mold, at the same time molten metal is poured into the sprue opening. the molten metal quickly flows to all parts of the mold before it begins to solidify.
A vacuum assist casting is accomplished after completing the investing and burnout procedure. The switch valve at the top center of the table is turned clockwise to close. After burnout, the flask is placed on top of the red silicone rubber pad on the casting table, sprue hole side up. The flask temperature should be between 550 and 750 degree F. The center of the flask should be directly over the hole in the middle of the vacuum table and rubber pad.
The flask should have even edges to insure a proper seal with the silicone pad. You can test for a proper seal by turning on the pump. The gauge should indicate from 20-25 inches of vacuum. If a good seal is not indicated, press down on the flask by laying tongs across the top. If a good seal is indicated, the metal is melted in the crucible and poured into the sprue opening in the flask. After pouring, the flame of the torch is left on the button of metal for a few seconds. The vacuum is then released and the pump turned off.
The flask is allowed to cool on the vacuum table. The flask with the cast article is then removed from the table and the article is remove, cleaned and finished.
To Use The Gas Ballast Feature
-
Using this pump for standard casting operations should not require the use of this feature.
-
Moisture that is carried into the pimp as vapor mist tends to condense into a liquid and combine with the vacuum pump oil. When moisture contaminates the pump oil, it reduces the pump's ability to reach its ultimate deep vacuum level.
-
The gas ballast valve purges a small amount of atmospheric air through the exhaust chamber. this extra volume of air mixes with the vapor to prevent condensation and to help exhaust moisture in the form of vapor from the pump.
-
To use the gas ballast, start the pump and open the gas ballast valve for 20 seconds. Close the valve to allow the pump to pull down to its ultimate vacuum level. The gas ballast valve is located beside the handle, opposite the inlet fitting.
-
The gas ballast valve may be opened or closed at any time during pump operation. It is fully open at two turns counterclockwise.
To Shut Down After Use
To help prolong pump life and promote easy starting, follow these procedures for shutdown:
-
Close any valve between the pump and the system.
-
Open the gas ballast valve, and turn the ISO-Valve to the CLOSE position.
-
Turn OFF the pump power switch.
-
Using this pump for standard casting operations should not require the use of the gas ballast valve feature.
Pump Components
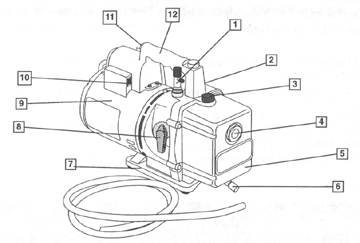
- Intake Fitting
- Gas Ballast Valve (located beside handle base)
- Oil Fill Port
- Sight Glass
- Die-Cast Aluminum Housing
- Oil Drain
- Molded Polycarbonate Base
- ISO-Valve - Isolates the pump from the system.
- Powerful, High Torque Motor
- Power Switch
- Through-The-Handle Exhaust
- Sure Grip Handle
Pump Maintenance
-
Keep the oil level of the pump up in the sight gauge. Change the oil 2 or 3 times a year.
-
Run the pump occasionally if idle for long periods.
-
For maximum performance, change vacuum pump oil after every 10 hours of operation.
Vacuum Pump Oil: The condition and type of oil used in any high vacuum pump are extremely important in determining the ultimate attainable vacuum. The use of premium high vacuum pump oil is recommended. This oil has been specifically blended to maintain maximum viscosity at normal running temperatures and to improve cold weather starts.
Oil Change Procedure
-
Be sure the pump is warmed up.
-
Remove the OIL DRAIN cap. Drain the contaminated oil into a suitable container and dispose of properly. Oil can be forced from the pump by opening the inlet and partially blocking the exhaust with a cloth while the pump is running. Do not operate the pump for more than 20 seconds using this method.
-
When the flow of oil has stopped, tilt the pump forward to drain residual oil.
-
Replace the OIL DRAIN cap. Remove the OIL FILL camp and fill the reservoir with new vacuum pump oil until the oil just shows at the bottom of the sight glass. The approximate oil capacity of the pump is 15 ounces.
-
Be sure the inlet ports are capped, then turn ON the pump. Allow it to run for 1 minute, then check the oil level. If the oil is below the sight glass OIL LEVEL line, add oil slowly (with the pump running) until the oil reaches the OIL LEVEL line. Replace the OIL FILL cap, making sure the inlet is capped and the drain cap is tight.
-
If the oil is badly contaminated, you may need to flush your pump. To flush, remove the pump drain cap and start the pump. Slowly pour a small quantity of flushing oil (50% new pump oil, 50% kerosene) through the oil fill inlet. Repeat this procedure as required until the contamination is removed.
-
Drain the flushing oil, then fill the pump with fresh oil as described in the above procedure.
Pump Troubleshooting Guide
Your ProCraft pump has been designed for dependable use and long life. If something should go wrong, however, the following guide will help you get the pump back into service as quickly as possible.
Failure to start
Check the line voltage. ProCraft pumps are designed to start at + or - 10% line voltage (loaded) at 32 degree F. At extremes, however, switching between the start and run windings may occur.
Oil leakage
Be sure the oil is not residual accumulation from spillage, etc. If leakage exists, the module cover gasket or shaft seal may need replacing. Follow the instructions supplied with the seal replacement kit. If leakage exists in the area of the oil drain plug, you may need to reseal the plug using a commercial pipe thread sealer.
Failure to pull a good vacuum
-
Be sure the pimp oil is clean. A badly contaminated pump may require more than 1 oil flush.
-
Be sure the vacuum gauge and all connections are in good condition and leak-free. You can confirm leaks by applying vacuum pump oil to suspected leak points. The vacuum will improve briefly while the oil is sealing the leak. Be sure the ISO-Valve on the pump is in the OPEN position.
-
Be sure the oil is at the proper level. For maximum pump operation, the oil must be even with the OIL LEVEL line on the sight glass when the pump is running. See OIL CHANGE PROCEDURE.
Do not overfill- operating temperatures will cause the oil to expand so it will appear at a higher level than when the pump is not running.
To check the oil level, start the pump with the inlet capped.
-
Check the oil level in the sight glass. Add oil if necessary.
Plate Maintenance
-
Do not force the valves. Use gently.
-
Use care to prevent molten metal from running into the vacuum tubing. This can happen if the investment in the flask is too thin walled and is torn out by the vacuum as pouring is undertaken. Have a minimum of ½" of investment below the mold cavity.
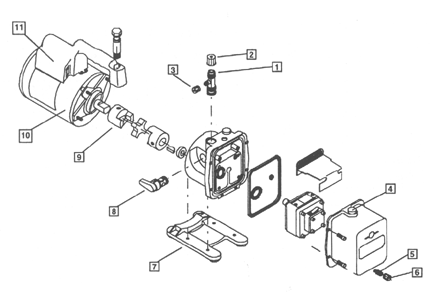
Replacement Parts
| Number | Part |
|---|---|
| 1 | Intake fitting |
| 2 | Intake Cap, 1/2" |
| 3 | Intake Cap, 1/4" |
| 4 | Oil Fill Cap |
| 5 | Oil Drain |
| 6 | Oil Drain Cap with Strap |
| 7 | Base and Foot Assembly |
| 8 | Valve Assembly |
| 9 | Lovejoy Coupling |
| 10 | Motor |
| 11 | Handle, Power Cord & Switch Assembly |
Vacuum Pump Specifications
| Model | 21-819 (110V) | 21-819X (220V) |
|---|---|---|
| Free Air Displacement | 4 CFM / 60 Hz | 142 Hm / 50 Hz |
| Stages | 2 | 2 |
| Motor Speed | 1725 rpm / 60 Hz | 1425 rpm / 50 Hz |
| Voltage | 110V / 60 Hz | 220V / 50 Hz |
| Factory Micron Rating | 20 microns | 20 microns |
| Approximate Oil Capacity | 15 ounces | 400 ml |
| Weight | 29 pounds | 15 kg |
| Width | 5-5/8" | 14.29cm |
| Height | 9-3/4" | 24.6 cm |
| Length | 151/2" | 40 cm |
| Intake | 1/2" & 1/4" SAE MFL | 1/2" & 1/4" SAE MFL |
| Minimum Starting Temperature | 1/3 hp Capacitor Start | 0.25 kw Capacitor Start |
| Operating Temperature | 155 F | 68 C |
-
All motors are internally protected (automatic reset)
-
Operating temperatures are typical for normal operating conditions.
© 2026 Shor International Corporation & The I. Shor Company. All rights reserved.