Vacuum Casting Machine Instructions
Equipment and supplies provided
Grobet Vacuum Casting and Investing Machine Instructions
Filling the Vacuum Pump with Oil
- Each bottle of vacuum pump oil comes factory-sealed for protection against contamination. Unscrew the cap and remove air-tight seal.
- Replace cap with filler cap included, cut off spout tip and attach filler tube.
- Remove oil II cap on pump (See separate vacuum pump operating instructions).
- Insert the filler tube into the oil fill port of the pump.
- Fill slowly until OIL LEVEL reaches bottom of sight glass.
- When pump is running, oil level should be in middle of sight glass.
- Add more oil if necessary.
Operating the Vacuum Pump
- When the pump is ready for use, uncoil l the electrical cord and plug into suitable outlet (110 volts or 220 volts).
- Place the vacuum control knob (No. 21800030) in the "VACUUM RELEASE" position.
- Push the rocker switch (No. 21800004) to the "ON" position and observe the oil in the sight glass to be sure it remains even with the Oil level line.
- It may be necessary to repeat this procedure two or three times until l all the required oil has settled into the pump system. Maximum oil capacity is 15 oz.
Testing the Vacuum Investing Table
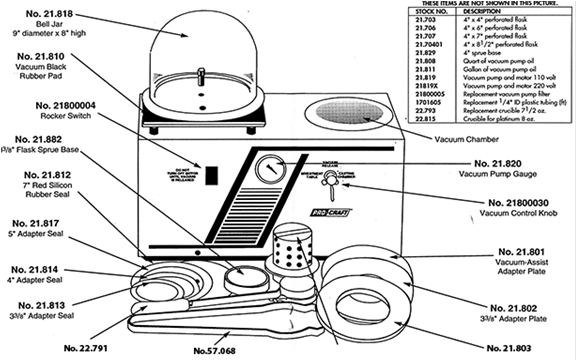
- Place the black rubber pad (No. 21 .810) on the vacuum table so that the hole in the pad aligns with the vacuum table intake.
- Place the bell jar (No. 21.818) on the rubber pad, making sure that the vacuum table intake is inside the bell jar.
- Push the toggle switch to "ON", which activates the vacuum pump.
- Turn the vacuum control knob to the "INVESTMENT TABLE" position to check vacuum pump gauge. The vacuum gauge needle should begin to rise immediately and, in less than one minute, should reach 29 inches plus at sea level (See "VACUUM GAUGE" chart.)
- If this does not happen, press firmly on the Range of the bell jar to assure a good seal between the bell jar and the rubber pad. Moistening the rubber pad may help in attaining a good seal.
Testing the Vacuum Casting Chamber
- Make sure the 5" adapter seal (No. 21.817) is properly aligned on the vacuum chamber.
- Add the vacuum-assist flask adapter {No. 21.801), and, with the vacuum pump running, place the silicon rubber seal (No. 21.812) off-centered over the hole in the center of the plate so that it will form a seal.
- Turn the vacuum control knob (No. 21800030) to the "CASTING TABLE" setting, and observe the vacuum gauge needle to make certain 29 inches of vacuum (at sea level) is attained. This indicates that the hoses are connected tightly and that the silicon rubber pad is seated properly.
- If a full vacuum is not attained, check all seals for air leakage, then repeat test. If all checks are good, machine is ready for use.
Preparation of the Crucible
A ceramic melting dish with handle is supplied with the unit. This crucible is an expendable item and must be replaced from time to time. To improve its useable life and pourability, it is suggested that the crucible be glazed by making up a thin poste of borax and then melting it with a torch. This will form a hard glazed lining inside the crucible. It is further recommended that separate crucibles be used for silver, yellow gold, white gold or other metals being cast.
Understanding the Vacuum Gauge
| Altitude (feet) | Pressure of Mercury | PSI |
|---|---|---|
| 0 | 30.0 | 14.7 |
| 2500 | 27.3 | 13.4 |
| 5000 | 24.9 | 12.2 |
| 7500 | 22.7 | 11.1 |
| 10,000 | 20.6 | 10.1 |
| 15,000 | 16.9 | 8.3 |
The vacuum gauge indicates vacuum in inches of mercury being pulled by the pump. This type of gauge depends on atmospheric pressure of 29.9 inches of mercury or 14.7 pounds per square inch, which is sea level pressure. If the surrounding altitude is increased, the ultimate vacuum reading will be proportion only that much lower. The following chart provides the common equivalents to various altitudes:
To read the correct vacuum in inches of mercury on your gauge, subtract the normal pressure for your altitude from 30.0, then add the figure to your gauge reading. The result will be the corrected gauge vacuum. An easy, quick check of your vacuum system can be made by placing a glass half filled with water (temperature between 70°F and 80°F) under the bell jar and applying vacuum. The water should “boil" (bubble violently) within 40 to 60 seconds.
For pump to operate properly, oil should be even with the OIL LEVEL line when the pump is running.
Care of Pump
With reasonable care, your vacuum pump will provide years of good service. Usually, Failure to perform satisfactorily can be corrected easily by a few simple checks:
-
Pump won't start
Ensure that the plug is in securely, the unit switch is "ON" and the receptacle is live. Pump and oil must be above 30°F; line voltage must be equal to the motor name plate ±10%. -
Pump or motor runs hot
Normal operating temperature is approximately 160° F, which is hot to the touch; line voltage and ambient conditions will affect this somewhat.
If you have checked these points and your pump still does not operate properly, follow the following instructions:
Returning a Unit
If it is necessary to return an inoperative unit:
- drain oil
- pack carefully, since claims for damage during transportation are virtually impossible to prove on "used machinery"
- return entire unit to your dealer
On your return order, simply stating the unit is "defective" is not enough; you must be as specific as possible:
- pump stuck, will not tum over
- motor will not start
- leaks oil
- accidentally dropped
- any other possible reasons for inoperative condition
The vacuum pump is warranted against defects in materials and workmanship for 1 year. These products are guaranteed when used in accordance with these directions and recommendations. The vacuum pump is warranted for the repair, replacement, or credit at invoice (our option) of products which in our opinion ore defective due to defects in workmanship and/or materials. It is not warranted for labor, expense or consequential damage. Repairs performed on items out of warranty will be invoiced on a nominal basis.
Investing Procedure
Following manufacturer’s recommendations, measure the correct amount of water and pour into mixing bowl:
- Weigh correct amount of investment material and introduce investment into the water. Stir the water and investment for 2 to 3 minutes, making certain that the investment slurry is very smooth in texture and free of lumps.
- Place the mixing bowl containing this slurry on the vacuum table and cover with plastic bell jar.
- Flip rocker switch (No. 21800004) to "ON" position.
- Turn vacuum control knob (No. 21800030) so that it points to the "INVESTMENT TABLE" position.
- The reduced air pressure under the bell jar causes the entrapped air in the investment to be released and rise to the surface. As this happens, the investment slurry will also rise. If it appears that this is happening, top the corner of the vacuum table sharply several times, and slurry level should drop.
- At the end of approximately 90 seconds, release the vacuum by turning the vacuum control knob (No. 21800030) to the "VACUUM RELEASE" setting, then turn pump off. Important: Never turn pump off before releasing vacuum, or oil will be sucked from the pump up to the table. Never allow the block rubber pod to cover the hole on the costing table while the investment table is in use.
- Pour investment mix into the flask. When using conventional, solid-wall flask and vacuum assist, it is recommended that a flask extender mode of preformed rubber be placed around the top of the flask to prevent overflow of investment during vacuuming. This allows pouring investment to the top of flask. When using perforated flask, it is necessary to cover flask perforations (or holes). It is recommended that you use flask jackets of preformed rubber for this purpose.
- Place the filled flask under bell jar, and activate the pump.
- Turn the vacuum control knob (No. 21800030) to the "INVESTING TABLE" setting and secure the seal between the bell jar and rubber pad.
- Now, vacuum the invested flask for approximately 1-1/2 minutes at full vacuum (29 inches at sea level). Care should be token not to over-vacuum the investment, since this can remove too much water from the slurry.
- Lightly topping the spring supported vacuum table with the hand will help to release bubbles from the flask during the vacuuming process.
- Allow the invested flask to set for approximately 2 hours before beginning burnout procedure.
Vacuum Chamber Casting Procedure
(Skip this step if using the Vacuum Assist Casting Procedure)
Casting in a vacuum chamber requires the use of specially designed perforated flasks. Select the appropriate flask adopter to match the perforated flask. (There is on adapter ring for 33/s" diameter flask and on adopter ring for 4" diameter flasks. The 5" diameter flask does not require on adopter ring).
Prepare the chamber for the flask as follows:
- Place the 5" adopter seal (No. 21.817) on top of the recessed costing chamber.
- Firmly seat the adopter plate (if using a 33/s" or 4" Flask) over the seal.
- Carefully align the appropriate silicon rubber ring on the adapter; this will form a tight vacuum seal. The flask will be placed through the hole in the adopter ring with flange resting on the silicon seal. Note: The sprue end must face up! The flask should be cast at a temperature between 700°F and 1000°F, depending primarily on the configuration of the object being cast. Then follow these procedures:
- Turn on the vacuum pump and turn the vacuum control knob (No. 21800030) to the "CASTING TABLE" position. Within a few seconds, the vacuum gauge needle should indicate a vacuum of 20 inches (at sea level) or more, which shows a good seal between the flask and pad.
- Melt metal in the handled crucible, fluxing as needed.
- When the metal is ready to cost, pour it quickly from the crucible directly into the mold. Note: Vacuum pump must be running during this period. Do not attempt a pour unless a good seal is achieved. After pouring, allow the flame of the torch to play on the bottom of the button of the metal formed by the pour. This requires only a few seconds, and assures progressive solidification of the metal in the costing.
- After completion of the cast, release the vacuum by, first, turning the vacuum control knob (No. 21800030) to the "VACUUM RELEASE"' position, and second, turning off the pump.
- Once all the vacuum is released, allow the flask to cool approximately 2 minutes before removing it from the pad. The cast piece can then be removed by quenching (or allowing flask to cool) and knocking it out with a rawhide mallet. If you prefer to knock out the piece, care should be token that the flask is not damaged to the point that a good seal cannot be formed on the next cast.
Vacuum Assist Casting Procedure
(Skip this step if using the Vacuum Chamber Casting Procedure)
Casting by vacuum-assist is accomplished with the use of standard solid-wall flasks and the vacuum-assist flask adapter. It is done on a level surface above the casting chamber.
- Place the 5" adapter seal (No. 21.817) on top of the recessed chamber.
- Then place the vacuum-assist adapter plate (No. 21.801) on top of the rubber seal.
- Place the 7" diameter silicon pad (No. 21.812) on top of the adapter plate, with the ½” hole directly over the hole in the plate.
- Position the flask so that its center is directly over the 1/2" hole in the plate and pad. Always use a flask which has smooth, even edges in order to achieve a good seal. Note: To prevent shrinkage porosity, the flask should be cast at a temperature between 700°F and 1000°F, depending primarily on the configuration of the object being cast. Thin objects (like filigree rings) require a higher temperature and thick objects (like gent’s rings) require a lower temperature.
- Turn on the vacuum pump and turn the vacuum control knob (No. 21800030) to the “CASTING TABLE” position. Within a few seconds, the vacuum gauge needle should indicate a vacuum of 20 inches (at sea level) or more, which shows a good seal between the flask and pad.
- Melt metal in the handled crucible, fluxing as needed. When the metal is ready to cast, pour it quickly from the crucible directly into the mold. Note: Vacuum pump must be running during this period. Do not attempt a pour unless a good seal is achieved. After pouring, allow the flame of the torch to play on the bottom of the button of the metal formed by the pour. This requires only a few seconds, and assures progressive solidification of the metal in the casting.
- After completion of the cast, release the vacuum by, first, turning the vacuum control knob (No. 21800030) to the "VACUUM RELEASE" position, and, second, turning off the pump.
- Once all the vacuum is released, allow the flask to cool approximately 2 minutes before removing it from the pad.
- The cast piece can then be removed by quenching (or allowing the flask to cool) and knocking it out with a rawhide mallet. If you prefer to knock out the piece, care should be taken that the flask is not damaged to the point that a good seal cannot be formed on the
© 2026 Shor International Corporation & The I. Shor Company. All rights reserved.