Instructions for The GXL-24 Pro Electronic Gold Tester
Introduction
The GXL-24 Pro Gold Tester™ is a high technology professional digital instrument, developed for efficient, non-destructive determination of gold karat values from 6 to 24 karats. The principle of the GXL-24PRO Gold Tester is based on an electrochemical process which measures the decay of electrical energy between the sample under test and the cathode in the sensor. The result is processed in karat and European Standard unit value. The GXL-24PRO Gold Tester determines platinum and the gold karatage in the 6-24 karat range in alloys commonly used in the jewelry industry. The base metals are found in these alloys are: copper, silver, zinc and nickel.
There are other types of gold (yellow, white and red/pink) that use these metals in different proportions. The most commonly used gold on the market is yellow, which utilizes as base metals, silver and copper in a silver to copper ratio of 2:1 up to 1:2. The Gold Tester will only give accurate results in commonly alloyed gold compositions. White gold's base metals consist of a small amount of copper, over 18% nickel, less than 5% of silver, and the rest is made up of zinc.
We recently noted that some low karatage (below 18k) has high copper content. If you obtain low readings on what appears to be 14k marked yellow gold, the alloy may have higher than normal copper content. Use the "R" button to obtain a correct reading. Red/pink gold's base metals are made up mostly of copper, less than 5% silver and a small amount of zinc. The GXL-24PRO is not recommended for dental gold alloys.
The mixture of palladium that exists in dental gold alters karat determination and may give a higher karat determination than actually exists. Besides determining the karatage of gold, the Gold Tester is also able to distinguish gold plated and gold filled items.
In cases when it is unknown whether an object is solid gold or gold plated, the manufacturer recommends that a small test point on the object be filled or penetrated with a needle to assure electrolyte penetration to the base material.
Important Recommendations
The precious alloys with gold amounts from 6 (250) to 24K (999.0) require the user to observe the following specific test conditions:
-
The object's test point must be cleaned thoroughly and vigorously with an eraser before each test. (Note: The eraser tip must be clean before use and free of residual from prior cleanings.) Herringbone and rope chains are composed of a lot of solder.
Low karat readings may be due to the testing of lower karat solder. Do not test the shank of a ring due to the fact that this area may have been soldered. Do not test or rely solely on the testing of clasps. Although the clasp may be in the correct karatage, the rest of the chain may be under-karated.
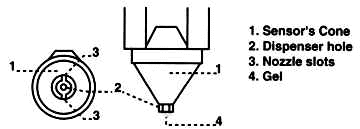
Important: Vigorous, thorough cleaning is essential for accurate results on high karatage (over 18K) gold. - The platinum contact inside the sensor's cone must be cleaned with a cotton swab moistened with cleaner and dried before use and after 6-8 continuous tests.
- The nozzle slots must be cleaned from dried or used gel and a drop of gel should be dispensed and disposed before each test.
- Use a minimum amount of gel for testing, especially for high karatage gold tests (above 18k). After dispensing a small dome of gel on the sensor tip wipe the tip on a piece of tissue paper by touching the tip to the tissue while holding the sensor in a vertical position to the paper. Do NOT use a dome of gel or an amount of gel that causes excess gel to appear along the edge of the sensor tip while testing. If there is not a sufficient gel to test the instrument will read "TRY AGAIN", but will not give an erroneous reading.

- The machine is not infallible and from time to time, for a variety of reasons, you may get a reading, high or low, which is inconsistent with your understanding of the expected karatage. ALWAYS make additional readings in other locations on the jewelry with special attention to cleaning, to verify unusual readings
- Very fine (thin) chains are very susceptible to crushing if the dispenser is pressed too hard on them.. always avoid pressing the dispenser against these thin chains while assuring gel contact. Two or three tests are recommended.
- Solder joints and certain spots on heavy castings may give erroneous readings due to the solder composition or non-homogeneous gold. Re-test new area if result is suspected.
- Many Italian gold chains and necklaces are coated with a wax-like material. If the readings are suspected, clean area to be tested by heavy erasing, or a drop of nitric acid. If the karat value increases with heavy erasure, you may be assured the gold is coated. In all cases, nitric acid has removed the coating.
- In heavily worn/used pieces, clean thoroughly with an eraser or non-acetone nail polish remover to remove dirt and skin oils.
- A pin prick or scratch on suspected plated pieces is often required to allow gel penetration to the base material to obtain an accurate result.
Specifications
The GXL-24PRO Digital Unit Dimensions:
| Length | title | Depth | Weight | Power |
|---|---|---|---|---|
| 7 1/4" (18.4 cm.) | 3 3/3" (8.57 cm.) | 9" to 1.1" (2.28 cm. to 2.79 cm.) | 1/3 lb. (165 grams) | Two 9 volt alkaline batteries |
Optional: DC converter from 120 V, 60 Hz AC, or from 220 V, 50 Hz AC, specifically designed for the GXL-24PRO WARNING: DO NOT USE ANY OTHER CONVERTERS OTHERWISE THE UNIT WILL BE DAMAGED.
Gold Tester Testing Range: From 6 (250) to 24k (999.0) of gold value.
The GXL-24PRO Display Reading Display Unit
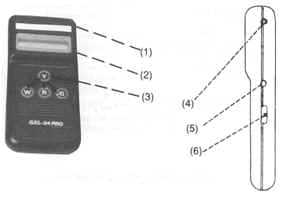
The GXL-24PRO Display Unit is a computerized controller which analyzes a signal from the electrochemical process and converts it to karat and European Standard value in an alpha-numeric display. (See diagram below)
Gold Value Data

- GXL-24PRO Display Unit
- Alpha-numeric Display Window
- Selection Buttons
- Sensor Outlet
- Converter AC/DC Outlet
- ON/OFF Power Switch
The unit will display one of the following values in the LC Display depending on the alloy under test:
Start - Buttons / Gold Color Indications
| Y-Yellow | W-White | R-Red (pink) | G-Green | ||||
|---|---|---|---|---|---|---|---|
| not gold | not gold | not gold | not gold | ||||
| 6-7KY | 250-291 | 6-7KW | 250-291 | 6-7KR | 250-291 | 6-7KG | 250-291 |
| 8KY | 333 | 8KW | 333 | 8KR | 333 | 8KG | 333 |
| 9KY | 375 | 9KW | 375 | 9KR | 375 | 9KG | 375 |
| 10KY | 416 | 10KW | 416 | 10KR | 416 | 10KG | 416 |
| 11KY | 458 | 11KW | 458 | 11KR | 458 | 11KG | 458 |
| 12KY | 500 | 12KW | 500 | 12KR | 500 | 12KG | 500 |
| 13KY | 541 | 13KW | 541 | 13KR | 541 | 13KG | 541 |
| 14KY | 583 | 14KW | 583 | 14KR | 583 | 14KG | 583 |
| 15-16KY | 625-667 | 15-16KW | 625-667 | 15-16KR | 625-667 | 15-16KG | 625-667 |
| 17KY | 708 | 17KW | 708 | 17KR | 708 | 17KG | 708 |
| 18KY | 750 | 18KW | 750 or more | 18KR | 750 | 18KG | 750 |
| 19KY | 792 | 19KR | 792 | 19KG | 792 | ||
| 20KY | 833 | 20KR | 833 | 20KG | 833 | ||
| 21KY | 875 | 21KR | 875 | 21KG | 875 | ||
| 22KY | 917 | 22KR | 917 | 22KG | 917 | ||
| 23KY | 958 | 23KR | 958 | 23KR | 958 | ||
| 24KY | 999 | Platinum | |||||
The Mechanical Sensor
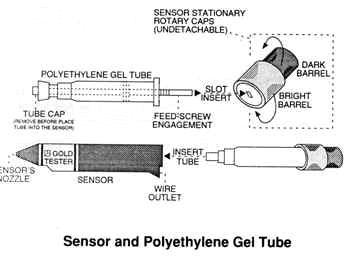
The Mechanical Sensor for the GXL-24PRO Gold Tester consists of two parts: (1) the sensor body; (2) a polyethylene tube with gel. The polyethylene tube must be placed inside of the sensor's body before beginning a test.
When using the Sensor, be sure that:
-
The sensor nozzle platinum contact and slots are clean. Use a cotton swab moistened with cleaner to clean the platinum contact and dry it before commencing tests and after every 6-8 repetitive tests.
-
Dispense a drop of gel before the start of each test.
-
It is recommended that the sensor be thoroughly cleaned with Tri SC-10 sensor cleaner when the gel tube is changed or if gel is backing up around the plunger.
Loading & Changing The Polyethylene Gel Tube

Take off the nose cone cap (See Diagram).
Remove the Stationary Cap by turning the Stationary Cap (light colored barrel) counter-clockwise. Please remember that the Stationary Cap and the Rotary Cap are undetachable.
Insert the Feed Screw Engagement into the appropriate slot of the Rotary Cap. Be sure that the Feed Screw is fully engaged.
Take off Tube Cap.
5. Insert the polyethylene gel tube, until it is fully lodged in the sensor and turn the light colored barrel clockwise until fully fastened. Do not turn the dark colored top barrel clockwise or it will damage the mechanism.
6. Turn the dark colored top barrel counter clockwise until the first drop of gel appears at the sensor nozzle (about 1020 times to fill the cone). The Mechanical sensor of the GXL.24PR0 Gold Tester consists of two pans: (I) the sensor body: (2) a polyethylene tube with gel. The polyethylene tube must be placed inside Of the sensor's body before beginning a test.
Operation Procedure
-

Load the polyethylene gel tube into the sensor (see procedure on Page 11 or this instruction manual).
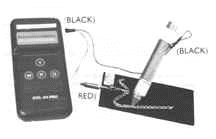
Connect the long black wire to the sensor's plug outlet, the short black wire connector to the display unit, and the red wire to the testing plate as shown in Diagram.
Turn the unit "ON." The unit should display "Clean sensor tip".
Before the start of testing, use the sensor nozzle cleaner or any small sharp instrument to remove dried or used gel from the dispenser opening and slots and clean the sensor tip thoroughly with a cotton swab wetted with alcohol, then dry the tip thoroughly.
Prepare the item for testing by thoroughly vigorously cleaning a spot on the jewelry with the eraser provided. When testing the 1 8-24K (750-999) gold, be sure that the eraser tip does not have a black deposit. Clean the eraser on a paper. Also clean the area on the item to be clipped and place cleaned item in clip.
The testing point on the object should be close to, BUT NOT TOUCHING, the alligator clip. Be sure this point is far enough away from clip so that gel does not touch the alligator clip as this will cause the clip to corrode and give erroneous results.
Place a tissue, paper towel or rag under the tip of the sensor and, holding the sensor on the vertical position with the nozzle down, twist the Rotary Cap counter clockwise, a click at a time, until a drop of gel appears on the tip. Wipe this first drop of gel on the towel and turn (usually one or two clicks) until a fresh drop appears. Use a minimum amount of gel for testing, especially for high karatage gold tests (above 18k). After dispensing a small dome of gel on the sensor tip wipe the tip on a piece of tissue paper by touching the tip to the tissue while holding the sensor in a vertical position to the paper. Do NOT use a dome of gel or an amount of gel that causes excess gel to appear along the edge of the sensor tip while testing. If there is not a sufficient gel to test the instrument will read "TRY AGAIN", but will not give an erroneous reading. Do not let gel or sensor nozzle touch the alligator clip.
Press one of the following buttons: Y-Yellow, W-White, it-Red (Pink), G-Green, depending on the color of the gold.
-
Maintain the sensor tip flat against the sample (perpendicular to sample) and hold firmly in the same position approximately five (5) seconds while the instrument displays the gold value in karat and European standard. Immediately after the PRETEST, retest the gold item to determine the karat value of the item. On retest, dry and re-clean the test point on the item, dispense and dispose one drop of gel (do not re-clean the sensor tip). Dispense a second drop and retest. This pre-test procedure is essential to neutralize any residual electrical charge remaining in the sensor tip after storage.
Important: After initially turning the unit "ON", perform a pre-test on the item. After every 6-8 continuous tests, clean the platinum contact of the sensor with cleaner and dry the contact. NOTE: On high karatage gold (greater than 17 karat, 708), the first test may result in a lower karatage reading due to the residual charge. It is always preferable to take at least two or three readings on high karatage gold. Repeatable readings on high karatage samples will assure the user of maximum accuracy.
Testing objects larger than the alligator clip

When testing objects larger than the alligator clip, unhook the red wire from the testing plate and proceed with the test as per instructions but this time touch the tip of the red wire to object.
Testing gold chains whose surface is covered in organic material
Some gold chains are covered by organic materials in order to add luster to the surface. These materials can alter the results of a gold test. In order to avoid this problem, an inch or two of the chain should be thoroughly cleaned with an eraser. The alligator clip and the sensor should be placed upon the chain well inside the cleaned and stretched area. As a result, there is an electrical contact between the alligator clip and the testing point. A suggestion on how to "RUB OFF" the organic substance in some Italian triple and quadruple herringbone chains is to use a small amount of non-acetone nail polish remover if the organic substance coating is thin, or to put a small drop of nitric acid in the test spot just enough to burn off the organic material. Wipe the test spot before touching the same with the sensor. Please note that 20K (833) - 24K (999.0) chain links are soldered with gold-solders which have a karatage lower than the chain link. If a test point is on solder, the instrument may show a lower karat value. Special caution is advised with rope or diamond cut chains. Two or more tests are recommended on different links to obtain accurate results. Good contact between the sensor and the test point is essential for accurate results.
CE of the GXL-24PRO Gold Tester
Before the start of testing, use the sensor nozzle cleaner or any sharp instrument to remove dried or used gel from the dispenser opening slots, and clean the sensor tip thoroughly with a cotton swab wetted with cleaner; then dry the tip thoroughly.
After each 6-8 consecutive tests, clean the platinum contact inside the sensor's cone with a cotton swab moistened with cleaner, and dry the contact. IMPORTANT: ALWAYS AVOID ANY RESIDUE AND MOISTURE ON THE PLATINUM CONTACT BEFORE TESTING.
Always replace the sensor's nozzle cap when sensor is not in use to prevent gel from drying up and clogging the opening.
After removing the gel tube from the sensor, wash the sensor with distilled water immediately, to prevent the drying of gel inside the sensor. It is recommended that the sensor be thoroughly cleaned with Tri SC-10 sensor cleaner when the gel tube is changed or if gel is backing up around the plunger.
Dispose of a drop of gel before each test.
Never remove the tri cable from the sensor's outlet by pulling wire. Pull the cable by the plug only. 7. The gels have a shelf life dependent on temperature. The gels should be stored at a temperature of 80½F (26.6 ½C) or less. For longevity, it is recommended that the gels be stored in a refrigerator when not in use. DO NOT FREEZE! The shelf life has been exceeded if the gels turn liquid. When stored below 80½F (26.6 ½C), the gels will not liquefy in less than six months and can be expected to last in excess of one year. As long as the solution is in a gel state, it will provide accurate readings.
Be sure to use TB-24 Pink color gel with the GXL24PRO Gold Tester.
Troubleshooting
| Problems | Solutions |
|---|---|
| Brown spot on test surface | Thoroughly rub the spot with an eraser. |
| On gold item display unit reads "TRY AGAIN" continuously | Check the wire contacts and connections or change wire set. |
| Turning sensor's rotary cap becomes difficult to turn or is tight; or a changed/reduced karat value appears in display | Gel tube is almost empty or empty. Put in new gel tube. |
| Inaccurate or different readings | Thoroughly clean sensor's contact, slots, and testing item. Keep gel away from alligator clip |
| Gel does not come out | Clean sensor nozzle and slots with a cotton swab wetted with alcohol, and dry the tip |
Advice
- Always try to select a testing point close to the alligator clip but make sure that the gel does not touch the alligator clip to prevent corrosion.
- Do not repeat a test on the same point without eraser cleaning. It is important to remember that a gold filled object's reading will be reduced after each additional eraser cleaning on the same spot.
- A solid gold object will not have reduction in its karat reading even with continuous erasing.
- In case the user doubts that the object is solid gold, it is recommended that the user make a tiny hole with a needle at the test point before a test.
- The GXL-24PRO Gold Tester must be used in accordance with these instructions, to obtain full satisfaction with the device.
© 2026 Shor International Corporation & The I. Shor Company. All rights reserved.