Shor Motorized Casting Machine Instructions
Warning: Before connecting to your power supply be sure to have the top cover of the machine in the upright position to prevent an accidental start.
Step-By-Step Process
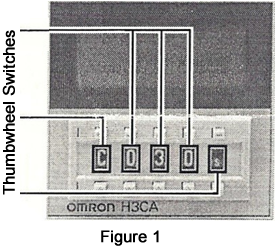
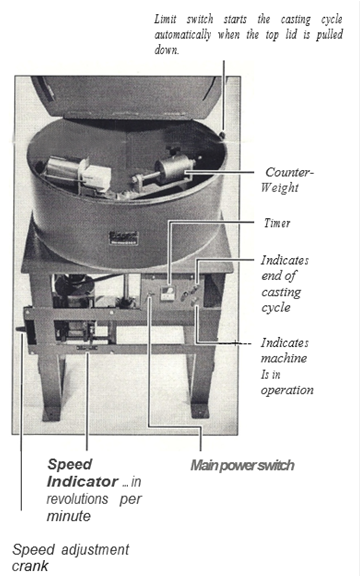
- Setting the timer: Using the thumbwheel switches on the timer, make the 3 settings shown below. Use the thumbwheel switches in Figure 1 to set the time in seconds. For a time cycle of 30 seconds, set to 0-3-0. This thumbwheel switch solenoid be set to “c" for ordinary ON-OFF operation. This thumbwheel switch should be set to "S" for timing cycles in seconds. Adjust the main power switch to the OFF position. Four flanges are provided at the base of the machine's legs for bolting the machine to your floor for added stability. The machine can now be connected to your power source.
- Preparing to Cast: The counterweight of the broken-arm casting assembly should be adjusted to off set the weight of the flask into which you will be casting. The counter-weight should be moved away from the center of the assembly for large flasks.
- Speed Adjustment: Speed adjustments should be made only when the broken-arm assembly is in motion. The spinning speed of the broken arm is adjusted according to the physical characteristics of the part to be cast. Finer, highly detailed pieces generally require higher speeds, which generate greater centrifugal force. The speed control crank is found on the left side of the machine. Turning the crank in one of two directions results in the following.
Turn Clockwise to reduce speed.
Turn Counterclockwise to increase speed.
Please remember to make this adjustment only when the machine is in motion.


Grounding Instructions
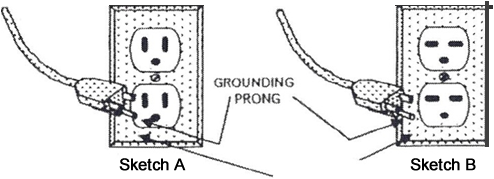
This tool should be grounded while in use to protect the operator from electric shock. The tool is equipped with an approved three-conductor cord and three-prong grounding type plug to fit the proper grounding type receptacle. The green (or green and yellow) conductor in the cord is the grounding wire. Never connect the green (or green and yellow) wire to a live terminal.
If your unit is for use on less than 150 volts, it has a plug that looks like that shown in sketch A. If it is for use on 150 to 250 volts, it has a plug that looks like that shown in sketch. Use of an extension cords or a 2 prong adapter is not recommended.

Tool Safety Instructions
- Keep Work Area Clean
Cluttered areas and benches invite accidents. - Avoid Dangerous Equipment
Don’t expose power tools to rain. Don't use power tools in damp or wet locations. Keep work area well lit. - Keep Children Away
All visitors should be kept safe distance from work area and appliance. - Store Idle Tools
When not in use, tools should be stored in dry, high and locked location out of the reach of children. - Don't Force Tool
It will do the job better and be safe at the rate for which it was designed. - Use Right Tool
Don’t force small tools or attachments to do the job of a heavy-duty tool. - Wear Proper Apparel
Do not wear loose clothing or jewelry that could get caught in moving parts. Tie back long hair or use a hair net. - Use Safety Glasses
Use safety glasses with all rotating tools. Also use a face or dust mask if cutting operation is dusty. - Don't Abuse Cord
Never carry tool by cord or yank it to disconnect from receptacle. Keep cord away from heat, oil, or sharp edges. - Secure Work
Use damps or wise to hold work. It's safer than using your hand and it frees both hands to operate tool. - Don't Overreach
Keep proper footing and balance at all times. - Maintain Tools with Care
Keep tools sharp and clean for best and safest performance. Follow instructions for lubricating and changing accessories - Disconnect Tools
When not in use; before servicing; when changing accessories such as blades, bits, cutters, etc. - Avoid Accidental Starting
Be sure that the switch is OFF when plugging.
.
The I. Shor Co. and I. Shor Canada are registered trademarks of Shor International Corp.
© 2026 Shor International Corporation & The I. Shor Company. All rights reserved.
© 2026 Shor International Corporation & The I. Shor Company. All rights reserved.