Instructions for M24 Gold Tester
Operating Instructions
0. Contents
- 1. Set Up
- 2. Testing Gold from 9K to 24K
- 3. Testing for Gold Plated Material
- 4. Gold Composition
- 5. Testing for Platinum
- 6. Table of Standards
- 7. Maintenance
- 8. Specifications
1. Set Up
Sharpen the Pencil Eraser and then cut off the end with a sharp knife or razor so that it is flat with rounded edges.
Then place the eraser into the Test Well and firmly rotate back and forth for about four seconds. Then brush debris the Test Well. This preparation will eliminate the excess buildup on the Reference Gold. For all tests of 20K to 24K Gold do this step of removing excess buildup on the Reference Gold with the sharpened and blade cut Pencil Eraser. A dirty Eraser tip will not sufficiently clean Test Well.
2. Testing Gold from 9K to 24K
Thoroughly clean the area of the gold you are testing with the Gray Eraser. Attach the Alligator Clip to an area of your gold piece that is opposite to the area you have just cleaned with the Grey Eraser.
Clean the Test Well Base with the Pencil Eraser. The Test Well Base is the small gold button at the base of the Test Well. For accurate, consistent results, a clean Test Well Base is essential. Paper towel and Q-Tips are also useful in removing any liquid or particles in the Well.
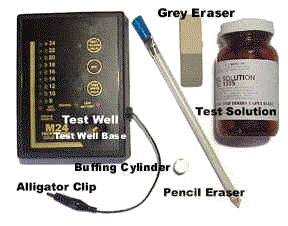 Loosen the cap on the Test Solution bottle, getting it ready for use. Press "TEST YELLOW GOLD" or "TEST WHITE GOLD" (to match the type of Gold that you are testing) and within two seconds, put three or more drops of Test Solution into the Test Well. To insure that the test solution has an extended life, quickly squeeze all of the air out of the Test Solution squeeze bottle and tighten cap firmly.
Observe that one of the "karat value" lights is on. Any "karat light" may be lit. This is determined by a previous test or by the length of time that the unit has been off. After the light goes out, (within 12 seconds), touch the gold that you are testing to the Test Solution that in the test well. Be sure that you have immersed your gold sufficiently into the liquid to start the "Testing" light, but be careful not to touch the Test Well Base at the bottom of the Test Well. In addition, be careful not to touch the Alligator Clip to the liquid. Hold the Test Gold without moving it until "TESTING" light goes off. This will take 2 to 15 seconds, depending on the Karat value of the gold you are testing. A good way to avoid moving the gold is to brace the "heel" of your hand on the unit or on the same surface as the unit rests on. When possible, rest the gold you are testing on the inside of the Test Well just under the surface of the liquid and be very careful not to touch the Test Well Base at the bottom of the Test Well.
It is important that the Test Gold not be moved about in the Test Solution until a reading is obtained.
When the "TESTING" light goes out, remove your gold. Read LED Display of Karat Value. Clean Test Gold thoroughly with soft paper towel. If necessary, use the provided buffing cylinder to remove any discoloration on Test Well Base. Thoroughly wipe the Test Solution from the Test Well using a paper towel followed by a Q-Tip. If re-testing is desired, see "DO'S ~ DON'TS".
Check to be sure that there is not excessive air in the bottle and that the cap is tightened firmly.
2.1. Precautions
After each test, the Test Well Base should be cleaned. Improper of insufficient cleaning of the test Gold before testing can increase the karat value readings. Never leave any chemical solution in the Well when not testing. If any chemical happens to come in contact with the Alligator Clip, clean immediately with a clean paper towel.
Your unit is operating correctly if occasionally you do get a reading in the next range. This can happen when the karat value of the gold you are testing is very close to the odd karat value, i.e. 17K, 19K, etc. Your unit is operating correctly when this occurs and indicates the gold you are testing is very near the in-between value.
The excess air must be squeezed out of the test solution bottle between tests or when stored. Squeezing out the excess air keeps the solution fresh. When all of the air cannot be squeezed out it needs to be replaced. In any case, the bottle must be replaced 6 months after first opening! "Up-fresh" test solution can cause the karat readings to go lower by one range. You should always have a fresh bottle of test solution available.
In the event the Alligator Clip contacts the Testing Solution, the Alligator Clip must be rinsed in water and thoroughly dried before using again.
Record here the date the bottle was opened:
2.2. Dos and Don'ts
Don't: use Testing Solution for more than one test; errors will result.
Don't: touch you gold or the Alligator Clip lead to Test Well Base. If this happens remove liquid and re-do the test procedure. Don't let Alligator Clip touch liquid.
Don't: leave liquid in test well. This will void your warranty.
Do: clean the Test Well Base before testing if it isn't bright and shiny. An unclean Test Well Base may result in inaccurate readings.
Do: keep Gold chains very tight (link to link) during testing. Use the fewest number of links (one if possible) between the Alligator Clip lead and the gold link to be immersed in to the liquid. Three problems can exist with testing chains:
There may be dirt or contamination between links that would require intensive cleaning (i.e. ultrasonic) before testing.
Some chains, especially certain European manufactured chains have a thin non-metallic coating that must be removed from an area before testing. The eraser pencil may be used to remove this coating.
When testing chains, remember that the solder often used at the link(s) is of a lower karat than the rest of the chain. Therefore, avoid testing in that area. Do make sure good contact is achieved between your gold and the Alligator Clip lead If the object to be tested is too large to fit in the clip lead, simply hold the clip lead lightly against your gold during test.
Do: always clean your gold with the Gray Eraser before retesting in the same location. Pink eraser can be used but it requires considerably more pressure and effort for accurate readings.
Do: replace the Testing Solution every 6 months after opening. Do use only within Operating Temperature 65°F to 90°F Do not use the buffing cylinder to prepare your gold for retesting:
3. Testing for Gold Plated Material
3.1. Introduction
Probably most of the gold plated items referred to as "costume jewelry" or "fashion jewelry" contain gold at the surface which is no thicker than eight millionths of an inch. Such a gold plate is referred to as gold flash. A large percentage of gold flash is sufficiently thin and/or porous (microscopically) that the M24 Gold Tester will "read through" the plate and indicate "NOT GOLD". A thicker plate will read as Karat Gold unless a portion of the surface being tested is erased with the eraser pencil or filed to expose the metal underneath. The eraser should be used as first choice since it is easier to use and non-destructive. However, the eraser will not work on thick gold plate.
3.2. General description of procedure
To determine that an item is gold plated "non-gold", the user of the M24 Gold Tester must take at least two different readings, one reading of a surface which has not been erased or filed. The reading of the erased or filed surface will be lower if the metal underneath is not Gold. (To be sure the metal underneath is not Palladium, see the section on "TESTING FOR PALLADIUM".) The M24 Gold Tester will read as "NOT GOLD" if a sufficient area of non-Gold is exposed to the liquid but the unerased or unfired gold plate exposed to the liquid does have some effect on the reading.
When testing for heavy Gold plate, it may be necessary to use a fast drying lacquer or material such as a clear fingernail polish. The area to be tested must be coated with the lacquer and allowed to dry. Next, make a file mark in the center of the coating deep enough to expose the base metal. Then test the exposed base metal with the M24 Gold Tester. Do not allow the Testing Solution to touch any part of the Gold that has not been coated. _ 7_
3.3. Precautions
When testing the unerased or unfired portion, be sure that the test area has been relatively unaffected by wear. Flat or thin Gold plated items will tend to be worn at the edges. If it is difficult not to expose a worn area when testing an unerased or unfired area, the user may wish to selectively mask any area in question with fast drying lacquer. The reason for masking a worn surface is that if you test a worn surface first, you may obtain the lower Karat reading before any erasing or filing has been accomplished. You, therefore, may not get a lower Karat value on your second test and not be able to determine that you are testing gold plate.
When testing the erased or filed portion, be sure that enough of the surface area immersed in the liquid in erased or filed down to expose the suspected "base metal" underneath.
3.4. More data on testing for gold plate
The vast majority of Gold plate is 22K or better. Most Gold plated jewelry is flash Gold plate and most flash Gold plate is less than 5 millions of an inch (1/8 micron). The M24 Gold Tester will read right through the 22K Gold plate and indicate anywhere from not Gold to 12 K Gold. Any time you get a 12K or lower reading, Gold plating should be suspected. To determine Gold plate simply use the gray flat eraser on the test sight and then inspect for the presence of base metal.
In addition, inspect the Gold color of items reading 9-12K Gold. If they are really 9-12K they would not have that "rich" color of a 22K Gold plated item.
3.5. Final Note
It is strongly recommended that users of the M24 Gold Tester practice testing for Gold plate on a few items believed or known to be Gold plated. A few sets of practice runs described under "General Description of Procedure" will impart confidence to the point that the user will find testing for Gold plate to be fast and easy.
4. Gold Composition
The M24 Gold Tester can distinguish between Karats of the two popular colors, Yellow and White, by means of color selector buttons. Most red color golds can be determined by using the White range selector button. Most green color gold can be determined by using theYellow range selector button. There are no ranges that are compatible for use on dental gold alloys.
5. Testing for Platinum
Platinum is indicated when the test-item reads 22K or higher. That is because white Gold above 18K is virtually non-existent.
Both Palladium and Platinum will indicate Karat Gold if tested. Platinum jewelry is usually traded at a higher price than Gold jewelry, so Platinum is seldom marked as gold. Palladium, however, is one-quarter to one-third the price of pure gold, so it should be noted that pure Palladium may read as medium Karat Gold. Palladium prong settings are sometimes soldered into diamond solitaire White Gold rings. If Palladium is suspected, it is easily distinguished from gold as nitric acid will quickly turn Palladium dark, Gold is not affected in this way.
6. Table of Standards
| Karat | Decimal Gold | Gold % | Part Per 1000 |
|---|---|---|---|
| 24 K | 1.000 | 100.0 | 1000 |
| 22 K | .917 | 91.7 | 917 |
| 20 K | .833 | 83.3 | 833 |
| 18 K | .750 | 75.0 | 750 |
| 16 K | .667 | 66.7 | 667 |
| 14 K | .583 | 58.3 | 583 |
| 12 K | .500 | 50.0 | 500 |
| 10 K | .417 | 41.7 | 417 |
| 9 K | .375 | 37.5 | 375 |
7. Maintenance
No maintenance is required.
When the "Low Battery" indicator flashes, it is necessary to replace the battery before operating the unit. Simply remove the 4 small screws located under the rubber feet on the rear of the Gold Tester. Carefully remove the rear cover Y Locate the 9 volt battery and replace with a new one. Replace the rear cover, being very careful not to pinch the wire leads with the cover. Replace 4 rubber feet.
| Problem | Cause(s) | Solution(s) |
|---|---|---|
|
|
|
|
|
|
|
|
|
|
|
|
|
|
|
8. Specifications
Range: 9, 10, 12, 14, 16, 18, 20, 22, 24 Karat
Automatic Shutoff after each test: Approximately 14 seconds
Test times: 2 seconds from 9-14 Karats
2-15 seconds from 16-24 Karats
Delay before beginning test: 12 seconds
Display time: 12 seconds
Gold colors: Yellow, White, Red, Green (see "Gold Composition")
Non-destructive testing
Distinguishes Gold Wash and Flash from Solid GoldCan be used to distinguish Gold Plate from Solid Gold (see "Testing for Gold Plate")
Dimensions: 6.3" x 4" x 1.5"
Weight with battery: 8 oz.
Operating Temperature: 65° F to 90° F (19° C to 32° C)
Battery: One (1) standard 9 Volt
© 2026 Shor International Corporation & The I. Shor Company. All rights reserved.