GS-24™ Gold Tester Instructions
Introduction
GoldStar-24 (GS-24™) is a computerized instrument developed for the quick testing and accurate determination of gold karat values. It is programmed to test values of yellow, white, red and green gold ranging from 5 karats to 24 karats. It tests and determines gold plated, gold-filled materials and base metals and defines them as "NOT GOLD". In addition to the different types of gold, GoldStar-24™ also tests and identifies objects made of Platinum and Palladium.
The Gold Star-24™ digital unit is a computerized controller that utilizes a newly patented, ST proprietary electrochemical method to obtain an analog signal and convert it to a digital. The unit then processes the converted signal and the final results are displayed on an alphanumeric LCD in both, American and European Standards.
Contents
|
1. Carrying case 2. Digital unit 3. Test probe |
4. Wire harness 5. Testing plate with an alligator clip 6. Electrolyte plastic dispensers |
7. Red eraser 8. Cleaning tissue 9. Optional AC/DC converter (110/220V) |
- Digital unit
- Alpha-numeric display
- Gold color selection buttons
- Low battery indicator
- Test probe outlet
- AC / DC converter outlet
- On / Off switch
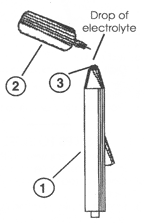
Chart of Gold Values as Displayed by the GS-24
| Yellow | Red | White | Green | ||||
|---|---|---|---|---|---|---|---|
| American | European | American | European | American | European | American | European |
| 5K | 208 | 5K | 208 | 5K | 208 | 5K | 208 |
| 6K | 250 | 6K | 250 | 6K | 250 | 6K | 250 |
| 7K | 291 | 7K | 291 | 7K | 291 | 7K | 291 |
| 8K | 333 | 8K | 333 | 8K | 333 | 8K | 333 |
| 9K | 375 | 9K | 375 | 9K | 375 | 9K | 375 |
| 10K | 416 | 10K | 416 | 10K | 416 | 10K | 416 |
| 111K | 458 | 11K | 458 | 11K | 458 | 11K | 458 |
| 12K | 500 | 12K | 500 | 12K | 500 | 12K | 500 |
| 14K | 585 | 14K | 585 | 14K | 585 | 14K | 585 |
| 15K | 625 | 15K | 625 | 15K | 625 | 15K | 625 |
| 16K | 666 | 16K | 666 | 16K | 666 | 16K | 666 |
| 17K | 708 | 17K | 708 | 17K | 708 | 17K | 708 |
| 18K | 750 | 18K | 750 | 18K | 750 | 18K | 750 |
| -- | -- | -- | -- | 20-22K | 833-816 | -- | -- |
| 21K | 875 | 21K | 875 | -- | -- | 21K | 875 |
| 22K | 916 | 22K | 916 | -- | -- | -- | 916 |
| 24K | 999 | -- | -- | -- | -- | -- | -- |
| Platinum | |||||||
| Palladium | |||||||
Components
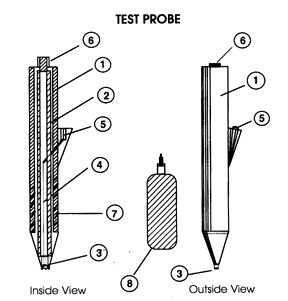
- Plastic cover
- Plunger
- Platinum electrode
- Connecting wire from platinum electrode (3) to connector (5)
- Test probe connecting outlet
- Push-button
- Spring
- Plastic dispenser with electrolyte
Operating Procedures - Assembly & Wire Connections
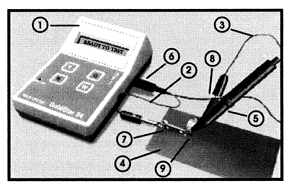
- Digital unit
- Red connecting wire
- Black connecting wire
- Testing plate
- Test probe
- Digital unit connecting outlet
- Alligator clip
- Test probe connecting outlet
- Gold sample / article to be tested
12 Steps to Successful Gold Testing
- Connect black wire (3) to the test probe (5) by inserting it into the test probe connecting outlet (8).
- Connect red wire (2) to the alligator clip on the testing plate (4)
- Plug dual wire junction (red and black) into the digital unit connecting outlet (6)
- Turn digital unit (1) ON by sliding the On / Off switch to On position. (See diagram 1 (7). The unit should display: READY TO TEST
- Place testing sample (9) on the testing plate (4) and secure the contact with an alligator clip (7).
- Select testing point on the sample close to the alligator clip but make sure that the electrolyte does not touch the alligator clip during the test.7. Before testing, thoroughly clean testing point with an ordinary red eraser (provided), in order to remove oxidation.
- Press and hold down push-button (6) of the test probe (diagram 2), and while holding it down. clean the tip of platinum electrode (3) (Diagram 2) with a paper tissue. After 10-15 tests, cleaning of the platinum electrode with a tissue paper damped in rubbing alcohol is recommended.
- Release push-button and flip the test probe nozzle shown at right. Fill sensor tip with an electrolyte from the plastic dispenser (2). Make sure that no air bubbles have formed in the portion of electrolyte drop.
- Firmly holding test probe straight up with its nozzle down. Place sensor tip filled with an electrolyte onto the previously selected, and eraser cleaned testing point on the sample. Make sure that selected testing point is completely covered by the sensor tip
- Test probe
- Electrolyte plastic dispenser
- Electrolyte drop
- While holding the test probe vertically down on the testing point, select and press one of the buttons (2) on the digital unit (1) in accordance with the color of gold that you are currently testing.
- The sign "Testing Yellow" or (Red, White, Green) will appear on alpha-numeric LCD indicating that the gold testing process is in progress. After a few seconds of analyzing, Gold Star-24™ will display the final results in both, American and European standards. The test is now successfully completed Note: Buttons (#2 in the above photo) are “Y” for yellow gold, “R” for red or pink gold, “W” for white gold and “G” for green gold.
- After each test thoroughly, clean the sensor tip with a paper tissue by repeating step (8). Note: Platinum sensor tip is placed on the testing point before it has been filled with electrolyte. or, it testing point has not been thoroughly cleaned with a red eraser or if the air bubbles have formed in the electrolyte drop. the alpha numeric LCD will display a "NO CONTACT" sign. Before further tests are attempted please repeat steps 7 through
- Testing Platinum and Palladium
- Press (W). White gold testing button on the digital unit.
- Proceed with the test in a usual gold testing manner.
Testing Gold Plated Articles: The sophisticated electronic design of the Gold Star-24™ and its state-of-the-art microprocessor allows the instrument to accurately distinguish the difference between gold-plated, gold-filled and solid gold materials. Electrolyte used by Gold Star-24™ in the gold testing process. Penetrates thickness of the material during the test to an approximate depth of 2.5 microns. As a rule, the correct results are usually achieved the first time (subject to a proper and thorough cleaning of the testing point with a red eraser.)
Another Method of Testing Gold Plated Articles
- Make 2-3 tests on the same sample spot.
- Thoroughly clean the testing point with the red eraser after each test.
- If the karat of the testing subject decreases after each test. The testing material is not gold. If there are any doubts about the material that you are testing, or if you suspect that the gold plated or the gold filled layer on the article is thicker than 2.5 microns, or to ensure that the results are correct, carefully sand testing point with a fine file so that the electrolyte penetrates the layer. Repeat testing procedure, steps 7 through 10 (12 steps). If the tested material is gold plated or gold filled the Gold Star-24 will identify it as NOT GOLD. Testing Articles Larger than the Alligator Clip: When testing articles larger than the alligator clip, remove red wire plug from the alligator clip, and while holding it down. firmly press the plugs metal tip against the eraser cleaned testing point, making an electrical contact. Proceed with the test by repeating steps 7 through
- Important Notes
- During the test, DO NOT push the button on the top of the test probe (sensor).
- After the test is finished, push the button of the test probe, and using tissue paper, clean the old electrolyte from the tip of the platinum electrode. After 10-15 tests, it is recommended to clean the platinum electrode with a tissue paper dipped in rubbing alcohol. DO NOT rub the platinum electrode with an eraser.
- Before testing, clean up the testing point on the sample with a red eraser to remove oxidation.
- Select a testing point on the sample close to the alligator clip, but make sure that the electrolyte does not touch the alligator clip.
- Make sure that no air bubbles have formed in the electrolyte drop.
- If you are testing on the same spot several times, be sure that the dark point has been removed with a red eraser before each test. If you did not remove the dark point, you can have a different result after each test on the sample.
- Make sure that the sensor tip covers the testing point.
- Always select testing point close to the alligator clip but do not let electrolyte touch the alligator clip during the test.
- It is not recommended to continuously test at the same point. If an additional test must be conducted at the same point, be sure that the surface is thoroughly cleaned after each test with the red eraser.
- During the test, the testing point should be completely covered with the tip of the sensor. Before each test, make sure that the electrolyte drop contains no air bubbles.
- Do not attempt to open or disassemble digital unit. This will distort the test results and void the warranty.
- If after continuous tests the air bubbles start forming in the electrolyte dispenser, slightly shake the dispenser one or two times and continue testing.
- The GS-24™ is not recommended for dental gold. The palladium that is contained in dental gold alters the determination of the karatage of gold. The GS-24™ also is not recommended for white gold that contains palladium.
Troubleshooting Guide for GS-24 GOLD STAR/Tester
| If the instrument continuously displays: NO CONTACT |
|
| If the instrument incorrectly displays: NOT GOLD |
|
| If the instrument displays different results |
|
© 2026 Shor International Corporation & The I. Shor Company. All rights reserved.