Grinding and Polishing Procedure Comparison
0. Contents
- 1. Introduction
- 2. Firescale Removal
- 3. Sprue, Parting Line and Other Flaw Removal
- 4. Ultrasonic and Ionic Cleaning
- 5. Brightening Crevices and Hard to Reach Areas
- 6. Removing Grinding or Sanding Marks (Tripoli Work)
- 7. Polishing (Intermediates Work)
- 8. Final Polishing (Rouging)
1. Introduction
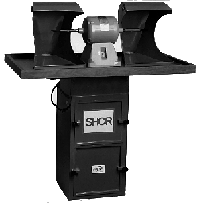 In 1953, Shor developed and introduced the world's first modem polishing systems, with isolated motors and bag type dust collection systems. Within 10 years, virtually every industrial polishing system in the world was a Shor system or a copy of one. Today's polishing systems are not much changed from the original one's we introduced 40 years ago. Though the polishing equipment hasn't changed much, still there are important new procedures, accessories and axially equipment now available that can make a world of difference in labor time, finishing time, quality of finish and gold recovery. Fortunately, none of the accessories or equipment is expensive (with the exception of electropolishing and centrifugal tumbling, equipment that is for very high production and will not be covered in this discussion). In many cases, you may already have the necessary equipment and accessories and lack only the knowledge of how to get the most out of them. In other cases, this guide may only serve to confirm that your present procedures are correct or perhaps this guide can offer some alternatives that you may want to try, In any case, if you have any questions or need more detailed instructions on one or more of the procedures, please feel free to call, write or fax us at Shor International.
There are many different procedures with which raw castings may be taken and brought to a final finish. The procedures a shop chooses to use and the order in which these procedures are accomplished, is the prerogative of each individual shop. The following instructions are intended as a general guide toward this end. We believe the following procedures and the order in which they arc accomplished to be the best way to finish raw castings. However, this is just a guide. The best way for your shop is the way that suits your needs best (and if that means doing things like wearing your lucky t-shirt when finishing or some other unorthodox procedure, then go with it).
2. Firescale Removal
Many shops begin the finishing procedure before the castings are even cut off the tree. Investment removers will go a long way toward deoxidizing your castings. Pickling in Safe-T-Pickle, Sparex or other pickling agent is quite common (virtually all dry pickling agents like Sparex are simply expensive trade names for a very inexpensive chemical compound, sodium bisulfate). another common procedure many shops employ is to deoxidize and brighten their castings by bombing. A few shops sand blast their castings.
Investment removers and pickling agents will not take off any metal from the castings. Bombing will dissolve some of the metal into the bombing solution. Sandblasting with glass beads will not remove any metal, but sandblasting with any other media will remove metal. Sandblasting with glass beads will brighten clean castings but is not very aggressive in removing firescale. For more detail on bombing and sandblasting procedures and gold recovery from them, refer to separate Shor instructions on these procedures.
We recommend pickling for fire scale removal. Pickling will do a fine job of removing the firescale yet it will not remove any It is a very fast and easy procedure which requires little or no equipment. In addition, the entire tree can be pickled at the same time.
3. Sprue, Parting Line and Other Flaw Removal
When a casting is cut from its tree, there still remains a bit of the sprue left (no matter how close you cut to the ring). This remnant of the sprue must be removed, and with it, any parting line (if it exists) and other blemishes (like little pimples, bumps etc). Most large shops grind these flaws off. Most small shops use a variety of tools including hand files and flexible shaft machines and other tools.
Even for the smallest shops (even for I man shops), we strongly recommend the use of MX grinding wheels to remove sprues, parting lines and other blemishes on the outside of the ring. MX wheels do a much faster and much better job than files and flex shaft machines. They have the following advantages:
Fine grit MX wheels leave only very fine, easily removed grinding lines (lines that are actually finer than many sanding lines.
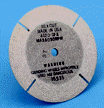 MX wheels do not clog nearly as quickly as other wheels.
The edge of the MX wheel should be prepared, after purchase, by cutting it with a diamond dresser to conform to the curvature of your rings (see Shor MX wheel instructions for this procedure). When this has been done, the sprue and parting lines can be removed in just a few seconds and the curves of the ring will be much more perfect than if the grinding had been done with files or a flex shaft machine.
MX wheels are run on a polishing motor. That leaves both hands free for better control. The high torque of the motor results in very fast removal of the flaws. And last, but certainly not least, removal of the metal on a polishing motor makes it much easier to control metal losses.
If the castings are rings, you may want to grind the inside of the shank. We recommend the use of a rotary file for this purpose. However, there are other options: emery paper mandrels, wood emery paper mandrels, shoulder and standard mandrels, emery ring shells and cartridge rolls. While these other options are fine, rotary files are better because: they give a consistent finish, cut quickly (even the fine) and last for a very long time. We recommend the use of a fine grade rotary files because they leave only fine grinding lines which are easier to remove.
Sanding should not be necessary if using a fine grade of MX wheel and rotary file. If there is a need to sand, then the best way to sand large areas quickly and consistently is with a cone-lok drum sander, This is a rubberized steel wheel that accepts strips of emery cloth and fits on your polishing motor.
We recommend that MX wheels and all grinding, rotary filing and sanding be done on a motor, hood and dust collector devoted only to this purpose. If it is not practical to devote a dust collector for this purpose, then don't use a dust collector for grinding. The grindings are heavy enough to obviate the need for a dust collector. If it is not practical to devote a motor to grinding, then devote just a hood to grinding. Before grinding, sanding or filing, remove your polishing hood and replace it with a grinding box (a closed hood with no exhaust vent). We recommend the use of the Shor locked grinding box. This is a box with a screen at its base and a locked drawer underneath the screen. While there is no way to insure that gold grindings walk out of your shop with your workers, the locked grinding box goes a long way toward this assurance. If you are doing the grinding yourself or do not want to invest in a prefabricated grinding box, any plastic box of the right size and with a light in it will do.
4. Ultrasonic and Ionic Cleaning
It is a good general policy to clean the pieces between each finishing procedure. This could be done by hand, but a much faster way is to use an ultrasonic. Ultrasonics have come way down in price since Shor first introduced them to the jewelry industry back in the early fifties. Now virtually every shop can afford one. An inexpensive and very effective alternative to the ultrasonic is the ionic cleaner. Ionic cleaners, in general, are just as effective as ultrasonics and they appear to have a better longevity track record. 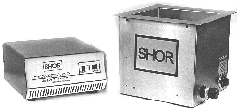
5. Brightening Crevices and Hard to Reach Areas
Both how and when to brightening crevices will vary from shop to shop. Brightening of crevices can be done at any time up and including the time of the final finish. There are 3 basic ways of brightening the crevices:
- Bombing or stripping
- Tumbling with steel pins
- Polishing with brushes
Each technique has its advantages and disadvantages, which will be outlined as follows. Please refer to the appropriate Shor instructions for "how to" details.
5.1. Bombing and Stripping
These techniques both use baths that are primarily cyanide and water to brighten jewelry (non-cyanide stripping solutions are available but they do not work as well and the primary ingredient, thiourea, is a suspected carcinogen). Each has its advantages and disadvantages.
Both bombing and stripping have the advantage that they allow a shop to do many pieces at one time very quickly and with a minimum of labor. Both have the disadvantage that they work with cyanide solutions (cyanide solutions can be safely used and disposed of only under tightly controlled conditions-see the appropriate Shor instructions for these conditions). Stripping has the advantage that its solution can be reused many times. Bombing solutions, only once.
The most important difference between the two techniques, however, is that bombing removes metal from and brightens the entire piece evenly but stripping tends to remove more metal from the high points (like prongs). This means that stripping, in general, will remove more metal than bombing from the castings (greater losses) and may actually damage the prongs on very light weight pieces. For this reason, we recommend bombing over stripping. See the appropriate Shor instructions for how and when to bomb and strip how to recover gold from bombing and stripping solutions and how to destroy the cyanide
5.2. Rotary Tumbling with Steel Pins
The advantage to tumbling is that it brightens large numbers of pieces will little labor (mass finishing). Tumbling requires much more time than bombing or stripping but requires slightly less labor. Tumbling with steel shot 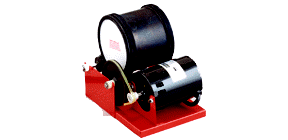 removes no metal. In general, tumbling does not get into the crevices as well as bombing.
Tumbling brightens pieces by hammering the surface with steel "shot". Because this technique results in a fine "hammered" effect on broad flat surfaces (an effect that must later be removed from these surfaces to get a quality finish), we recommend that all tumbling be done prior to tripoli work. The tripoli work will remove the hammered effect from the broad surfaces, but will not reach the crevices where the brightening will remain. Most steel shot has relatively few pins in it. Yet the pins are the component of the shot that brightens the crevices. For this reason we recommend adding pins to your shot mixture. A good ratio of pins to standard ball shot is 50/50, however, trial and error will tell you what works best for you. For detailed "how to" instructions on tumbling, see the appropriate Shor instructions.
5.3. Magnetic Tumbling with Steel Pins
This is a relatively new technology and is excellent for burnishing the hard to reach areas as well as any surface which is not very flat. Flat surfaces 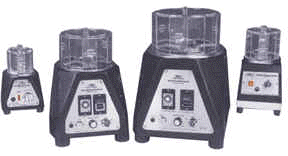 tend to get a bit of a "haze" on them by this means of finishing. If using on flat pieces, a quick buff with a wheel easily removes the haze. The high G's produced in magnetic tumblers results in a burnishing action that is just not possible with standard tumblers or vibratory machines. With media as small as .010 in diameter and .250 in length, these stainless steel pins are able to work in areas such as undercuts, recesses, slots etc. where no previous method has been found suitable. Finishes the most intricately detailed parts. Very quiet when compared with most other forms of finishing. Typical finishing time on gold and similar metals is only about 30 minutes. This is an excellent method of automatic finishing, producing rapid final finish results with an absolute minimum of labor.
5.4. Polishing with brushes
This technique, without question, gives the greatest luster. It is, however, very labor intensive. When properly done, most retail customers cannot tell the difference between a bombed piece and a brushed piece. For this reason, we do not recommend the use of brushes for most pieces. To find out how to choose the right brush for the right job, see the appropriate Shor instructions.
On balance, we recommend bombing as the best overall technique for brightening the crevices.
6. Removing Grinding or Sanding Marks (Tripoli Work)
This may be accomplished by sandblasting or tumbling or polishing with a high (fast) cut polishing compound like tripoli. However, we recommend the use of a vibratory finisher here. In the early 1970's, Shor introduced the precious metal jewelry industry to vibratory finishers. It wasn't until the '80's though, that they began to become popular. Vibratory finishers are very inexpensive mass finisher systems that have a great many important advantages over hand finishing, sandblasting and tumbling.
6.1. Sandblasting
Sandblasting does a great job. If sandblasting, use first a coarse media (like carborundum grain or pumice or sand) to do the tripoli work. Next, change the media to a glass bead to do the polishing. When finishing with a sandblast machine and with these media, it is generally not necessary to bomb or tumble, and sandblasting can replace virtually all of the hand tripoli work and almost all of the hand rouge work. Unlike mass finishing machines, sandblasting has the advantage of allowing the operator to use his intelligence when required to blast a little more here or a little less there. Mass finishing machines do not provide for this option. Another advantage of sandblasting is that the media gets into every little nook and cranny. Mass finishing media generally doesn't do that. On the other hand, sandblasting is more labor intensive than tumbling or vibratory finishing. And, while sandblasting will remove much less metal than hand finishing, it is very difficult to recover the gold from the sandblast media.
6.2. Tumbling
Generally speaking, tumbler cannot work well with any media except steel shot. Steel shot, because it is not abrasive, does not lend itself well to removing grinding or sanding scratches.
6.3. Hand polishing
Tripoli work done by a skilled polisher will yield excellent results especially in those circumstances where a little intelligence is necessary. And when lapping is necessary, there is no substitute for hand lapping. In addition, there is no faster way to do tripoli work. On the other hand, hand polishing is very labor intensive and generally results in much greater gold losses than any other technique. This makes hand polishing a very expensive technique that should be reduced to a bare minimum.
6.4. Vibratory Finishing
Vibratory finishers do the tripoli work by using a light weight plastic media impregnated with a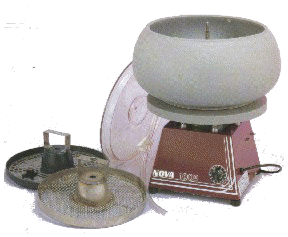 cutting compound (like carborundum, silicates or aluminum oxide). Vibratory finishing takes longer than other techniques but will accept hundred of pieces at the same time and requires almost no labor. The result is a very dull but smooth piece, ready for the rouge work. Very little metal is removed in this finishing process (approximately 1/10th of 1% per hour of running time with a fine grade media- average time 8 hours) and the metal is reasonably easy to recover. Vibratory finishers cut very evenly on all surfaces. That means that the vibratory finisher will preserve details. It also means that they will preserve flaws, so it's important to do a good job removing those flaws before the pieces reach the tripoli stage. For more details on the process of vibratory finishing, please consult the Shor instructions on vibratory finishing.
7. Polishing (Intermediates Work)
This is the step between the tripoli work and the final polish. This step is often skipped by many shops, and it is not absolutely necessary. Each shop must determine what works best for them.
There are several ways in which the intermediate polish can be accomplished. A common technique is to use a tumbler with steel shot as the media. It is our opinion that, at this stage, tumbling is unwise and should be avoided. The shot will impinge on the broad flat surfaces of the work and leave a beaten hammered effect (an effect that must later be removed in the final polish in order to achieve a quality finish). In addition, the shot also has the effect of bending or breaking prongs.
Hand polishing with intermediate compounds like graystar and white diamond is another possibility, but hand polishing at this stage has the same drawbacks as it did at the tripoli stage.
We recommend that, for most pieces, you should either vibratory finish with a rouge impregnated walnut shell or corn cob- or you should skipped this intermediates step altogether. Vibratory finishing will take the dull smooth jewelry and transform it with a luster just short of a final finish (for stampings and silver, this is often a final finish). Vibratory finishing at this stage will not remove any metal at all. It does, however, require a minimum of 24 hours processing time.
8. Final Polishing (Rouging)
This must be done by hand. Please refer to the appropriate Shor instructions to choose the appropriate polishing compounds, buffs, ring buffs, brushes, felt wheels, laps and cones to suit your particular needs, or contact us directly for support.
8.1. Rotary Tumbling
Strengths:
- Inexpensive to finishes curved surfaces and brighten settings.
- Very short learning curve to gain the basics on how to use equipment.
- With a lot of experience, almost all of the weaknesses can be overcome.
- Burnishing removes no metal.
Weaknesses:
- Tends to give flat surfaces a "beaten" appearance.
- Tends to round off sharp edges, obscure fine details and bend thin prongs.
- Uses steel shot, which tends to get stuck in settings.
- Even though the basics of tumbling are learned in an afternoon. To obtain the best results requires a lot of experience.
- Not very good for cut-down process (the tripoli work)
8.2. Magnetic Tumbling
Strengths:
- Very fast.
- Short learning curve.
- Excellent for getting into small crevices
- Burnishing removes no metal.
Weaknesses:
- Relatively expensive.
- Relatively small capacity.
- Gives slightly frosted look to large flat surfaces (light buffing removes this haze).
8.3. Vibratory Finishing
Strengths:
- Excellent for cut-down (tripoli work)
- Good for rouging work.
- Very inexpensive.
- High capacity
- Short learning curve when using proper instructions.
- Preserves details. Very little rounding of edges.
- Rouging removes no metal.
Weaknesses:
- Works with very light media and which is relatively slow.
- Not good for crevices. Not good for inside settings.
8.4. Electropolishing
Strengths:
- Lightning fast. Finishes in seconds.
- Finishes crevices and settings better than any other equipment.
- Preserves details better than any other equipment.
- Excellent for flat surfaces as well.
- Inexpensive to operate.
- Gold is recovered as flakes of gold. Does not need to be extracted from an abrasive or polishing media. 100% recovery.
- Parameters can be adjusted to polish more aggressively at high points or in crevices.
Weaknesses:
- Uses cyanide based salts.
- Expensive to purchase
- Relatively long learning curve to determine the best parameter settings for your particular rings.
Stripping
Strengths:
- Inexpensive to purchase and to run.
- Finishes in seconds or a few minutes.
- Gold is recovered as flakes of gold. Does not need to be extracted from an abrasive or polishing media. 100% recovery.
- Uses cyanide based salts.
- Does not work well with white gold.
- Does not work well with low and high karat gold.
- Is much more aggressive at the tips of prongs than inside the settings.
Weaknesses:
- Uses cyanide based salts.
- Does not work well with white gold.
- Does not work well with low and high karat gold.
- Is much more aggressive at the tips of prongs than inside the settings.
© 2026 Shor International Corporation & The I. Shor Company. All rights reserved.