Instructions for Electric Ring Cutter
Setup
0. Insert ring cutter shaft into the cordless motor as far as it will go (Figure 0).
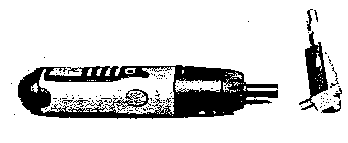
Figure 0
Step-By-Step Process
1. Place the guide under the ring so that the ring fits into the flat cutout section (Figure 1).
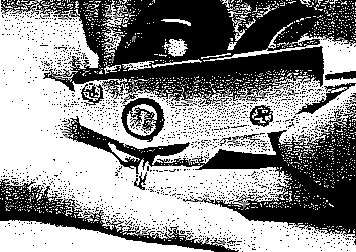
Figure 1
2. Before applying pressure, start motor in the Forward direction only (Figure 2).
Important: Never use the Electric Ring Cutter in the reverse position.
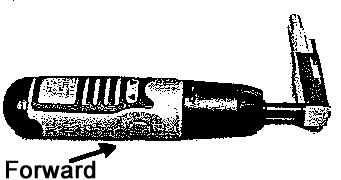
Figure 2
3. Gradually apply pressure against the ring by pressing down on the lever slowly (Figure 3).
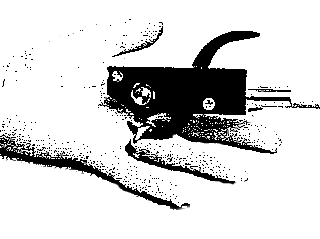
Figure 3
4. Most rings can be cut in seconds. For heavier alloys, two cuts, widely spaced, may be necessary.
Saw Replacement Directions
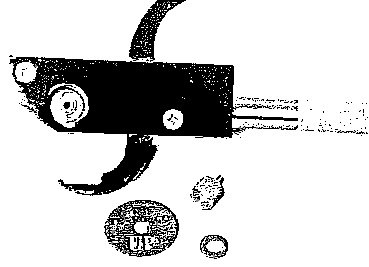
Figure 4
- Loosen the knob and remove the used saw.
- Shake the Electric Ring Cutter gently to remove shavings.
- Place new saw on shaft with "UP" facing you and "D" shaped hole firmly seated on "D" shaped shaft (Figure 4).
- Place nylon washer, if supplied, over "D" shape on top of saw and tighten the knob firmly with finger pressure only to remove "wiggle" between saw and shaft.
Important: Saw must be installed with "UP" facing you or else the warranty may be voided.
Maintenance
- Gently shake the Electric Ring Sizer after each use to remove shavings.
- Always use a sharp saw.
- Do not lubricate or disassemble.
Battery Installation
- The AS600 screwdriver uses four size AA alkaline batteries only.
- To install batteries in your tool, remove the end cap by depressing the two tabs, as shown in Figure 5.
Pull end cap out of the tool, as shown in Figure 6, and observe the battery position instructions printed on the battery holder. (The plus and minus ends of the batteries are marked with + and - signs).
Note: Some battery manufacturers mark only the plus (+) ends of the batteries. In these cases, the unmarked end of the battery is the (-) end. Install the batteries as indicated and reinstall the cap.-
The end cap and battery holder assembly will only fit back into the tool one way. If it does not seem to fit properly, don't force it. Rotate it one halfway around and try it again. When it is in all the way, ensure that the two tabs snap into place.
Important: Incorrectly installed batteries will reduce the tool's performance or prevent its operation entirely. If your batteries are fresh and you feel the tool lacks power or doesn't run, double check the battery holder to see if the batteries are installed properly. (+ and - signs aligned as shown). - Be careful when storing the tool so that the switch is not inadvertently depressed by some object. This would, of course, deplete the batteries in just a short while.

Figure 5
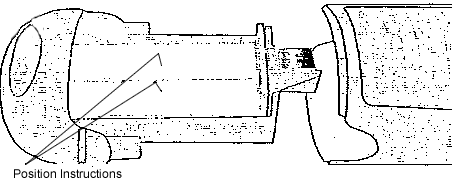
Figure 6
Features
- Switch, forward direction
- Switch, reverse direction
- Bit holder
- Spindle lock collar
- Battery holder
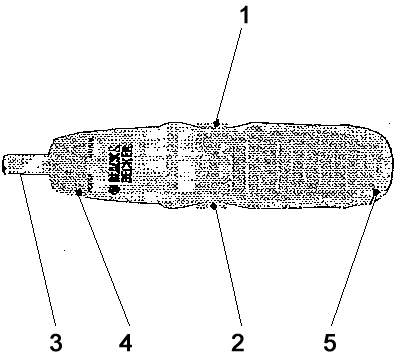
Figure 7
The lifetime warranty provided is exclusive of saw and driver.
Warning: Use with caution. The Electric Ring Sizer is a precision cutting instrument. The user is responsible for the safe use of the Electric Ring Sizer.
.
The I. Shor Co. and I. Shor Canada are registered trademarks of Shor International Corp.
© 2026 Shor International Corporation & The I. Shor Company. All rights reserved.
© 2026 Shor International Corporation & The I. Shor Company. All rights reserved.