Drum Sander Instructions
Step-By-Step Process
Assembling the notched coated abrasive onto the T-clamp wheel
- Lay the wheel flat with the "Cam Lock & Pin" upright in the twelve o'clock position. The "T-Clamp" is located in the center of the depressed area in the outer rubber diameter surface. It is held in place with a threaded stem, which is fastened in the interior of the wheel hub.
- Tighten down the "T-Clamp" by turning it until it barely touches the outer rubber diameter surface. Then back it out by ¼ turn. The "T-Clamp should now be parallel and above the depressed area in the outer rubber diameter surface.
- Insert one edge of the abrasive strip with the grain side facing outwards beneath the "T-Clamp" and wrap it tightly around the periphery of the wheel. Tuck the notched end beneath the "T-Clamp" and above the opposite end of the coated abrasive strip.
- Using the "Locking Tool" provided, move the "Cam Lock Pin" to the right until it rests in the "Cam Plate" notch. This movement will tighten the "T-Clamp" down onto the notched ends of the coated abrasive strip and hold it in place during operation. If you find that the coated abrasive strip appears to be loose or too tight, additional adjustments on the "T-Clamp" and re-positioning of the coated abrasive strip may be necessary.
Before assembling an abrasive strip, make sure that the "Cam Lock Pin" is in the left or loose position.
Remove the "Locking Tool" from the wheel before operating.

Figure 1: Abrasive cloth measurements
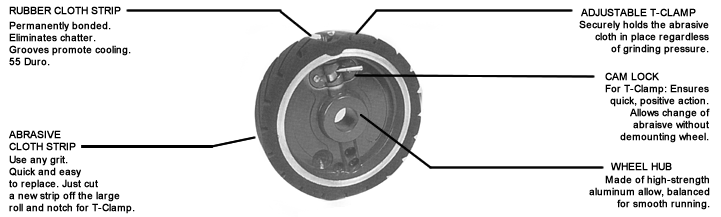
Figure 2: Components of the drum sander.
.
The I. Shor Co. and I. Shor Canada are registered trademarks of Shor International Corp.
© 2026 Shor International Corporation & The I. Shor Company. All rights reserved.
© 2026 Shor International Corporation & The I. Shor Company. All rights reserved.